The Cemetery management feature of the CMS system can help you
manage cemetery plot assignments, care schedules, fees, and any
other data associated with your cemetery plots. A Cemetery chart
allows you to view graphically your cemetery plot layout and
clicking on a plot on the chart automatically displays the
information associated with that plot. You can print the chart for
easy reference at any time.
There are two ways to enter information into the cemetery
management facility. The first is by using the View window and
pressing the Cemetery Plots button. This opens the cemetery
plots window which allows you to associate plots with members on
your member list. This makes entering data easier, since the plot
will be automatically be connected to the member data. Members can
own up to 10 plots via this window. The second way to enter
cemetery plot data is by displaying the cemetery chart via the
Reports|Cemetery|Chart menu option on the Main Window or the
Accounts Receivable window. Here, you view the chart and click on
any plot whose data you want to modify. A plot that does not have a
name listed indicates an available plot. When you click the plot,
the Cemetery Plot information window displays, allowing you to
enter detailed data about the plot, such as the owner, the name of
the interred, etc. A plot displaying a name indicates the owner of
the plot. A plot displaying a name and a date indicates the name of
the owner of the plot followed by the date of interment.
Cemetery Plot Reports
Use the Reports|Cemetery|Report menu option to preview/print
a report on all cemetery plots that are currently owned, sorted by
name of owner and also by section name.
Cemetery Chart
You must provide a 'chart' of your cemetery layout arranged by
cemetery and section.
This cemetery layout chart file must be called CMS.PCT, and this
file must reside in the same folder as your CMS.EXE file. The file
can be created using any simple text editor such as Windows Notepad
or Windows Wordpad. You can have totally blank lines in the file,
which can be used for spacing purposes.
The CMS.PCT file can contain 3 types of data records:
section record(s)
row descriptor record(s)
comment record(s).
The format of these records is as follows:
Comment Record
A comment record begins with the characters /* in column 1 and can
contain any information you desire.
You can also have totally blank lines, which will be ignored, for
spacing purposes in the file.
Section Record
*section sectionname
The start of each cemetery facility (even if you only have a single
facility) must begin with a section record, which begins in column
1 with the characters *section and is followed by the
sectionname where sectionname is the name of your
particular cemetery or the name of your section of a cemetery, such
as Congregation Brothers of Israel, Main, etc.
Row Descriptor Record
Following each section record you provide row descriptor
records as follows:
S/P/F/B Plotname1 Plotname2 Plotname3
Plotname4 . . . .
where S/P/F/B is called the control descriptor
and must start in column 1; S is required and P/F/B
are optional but if F is specified, P must be specified and if B is
specified, P and F must be specified. These values are coded as
follows:
S = "c" (required)
P = page number for printing plot charts (max 9 pages). This
number means that all rows with the same page number will print on
the same page; since an 8 x 10" sheet of paper cannot generally
hold an entire cemetery chart, you break the facility into sections
that can fit on one sheet of paper and assign each section a page
number (optional)
F = left-most # of filler spaces or default is 0 if omitted
(max 9 spaces) . This value enables you to indent a number of
spaces (optional) (see Example 1 below).
B = number of blank rows to display following this row, to
allow for gaps between rows for walkways or trees, or rows owned by
other organizations or owned privately (optional).
One row descriptor record line in CMS.PCT corresponds to one 'row'
of cemetery plots, where a row is a run of adjacent plots.
You can use any numbering/naming scheme for the actual plots
themselves, but you should try to be somewhat consistent.
Any plot or area that you would like displayed but which is not
usable for burial should have an asterisk (*) in the plot
name. This can be used, for example, to display on your chart where
a walkway exists. You can specify the plot name as “Walk*”.
Each plot must have a different name, except for those plot names
that have an asterisk as part of the name.
Cemetery Chart Examples:
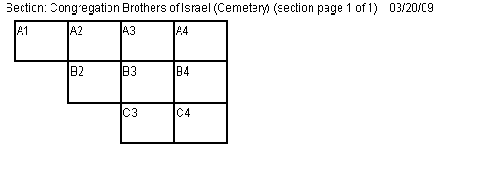
Cemetery Chart Example 1:
| /* /* First section, Congregation Brothers of Israel
(this is a comment) /**section Congregation Brothers of Israel |
In this case, plot B2 is located “south” of plot A2 but there is no
usable plot at the location where plot B1 would normally be located
and also no usable plot where plots C1 and C2 would be (this could
be due to trees or monuments in those locations or perhaps plots
that belong to other organizations or are privately owned). To
indicate this, you indicate 1 filler for row B (via the last “1” in
the control descriptor c/1/1) and 2 for row C (via the 2 in the
control descriptor c/1/2) so that when the chart is printed, the
columns line up correctly. No fillers are needed for the right hand
side of a row, since the default is left-justification. The 1 after
c/ indicates that these rows should display on the same page, and
that page is page 1.
Here is what the chart would look like for example 1:
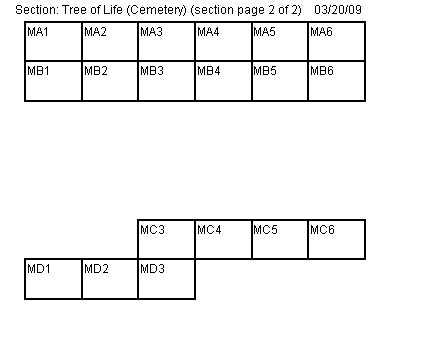
Cemetery Chart Example 2:
/* Cemetery chart for section Tree of
Life
*section Tree of Life |
Example 2 displays one cemetery section with 4 rows of plots.
Row 1: The control descriptor “c/2/0” in the first row
indicates “c” for cemetery, “2” to mean this data should print on
page 2 of the cemetery plot chart and “0” means no blank plots on
the left.
Row 2: The control descriptor “c/2/0/3” in the second row
indicates there is a spacing of 3 blank rows following the second
row.
Row 3: The control descriptor “c/2/2” in the third row
indicates the first plot starts 2 unusable plot positions to the
right. This could be due to obstacles such as trees or monuments in
those locations or plots that belong to another organization and
should not display on your chart. The data may be entered into the
CMS.PCT file to reflect this by typing the first actual plot 2
plots over (so that plot MC3 is directly below plot MB3), but this
is not necessary, as the system will perform the necessary spacing
based on the “2” of the “c/2/2” control descriptor and not based on
the spacing used to enter the data in the CMS.PCT file.
Row 4: The fourth row contains 3 plots followed by 3
non-assignable plot areas (could be obstacles or plots belonging to
another organization).
Here is what the chart would look like for example 2:
--End of Examples—
Notes:
The names of the plots in the CMS.PCT file should match the names
of all plots that are owned or can be owned by members of your
organization.
An error message will be displayed if two or more plots have the
same plot name (unless the name has an asterisk in it) and the plot
chart information will not be successfully processed.
The CMS.PCT cemetery plot chart file need only be created one time
and can be modified at any time to add additional plots to your
chart and data facility.